Precision Image Digitizer (PID) is a program for tracing and recording the coordinates of selected
points in a graphics image file. It can read in a JPG, GIF, or BMP file and you can then use your
mouse to point and click on the points in the image that you would like to record. The coordinates
are displayed on the screen as you click them and they can then be exported to an ASCII text file,
exported to an AutoCad DXF file, or printed. These files can then be imported into any other program
capable of reading in text files or DXF files. You can also use the Windows clipboard to copy and
paste images into and out of the program. The point coordinates are measured in pixels from the zero
location (0, 0) at the lower left of the image. The horizontal axis is X, the vertical axis is y.
You can assign a scale factor to the coordinates so the numbers on the bottom of the screen are
displayed in real units such as inches. Setting the scale factor is very easy. Just click on two
points on the image where you know the distance between the points.
This is a 32 bit program and runs on Windows ME, NT, 2000, XP, and Vista.
See the
bottom
of this page if you would like to
purchase
this program for
$20.00
(Twenty US Dollars). This demo version works fine even if you do not pay for it. It is fully functional except it cannot save or print files. There is no time limit. It will run forever. It contains no spyware, no advertising. If you purchase this program I will send you the fully functional purchased version
with file save and file print included.
Fast Start
Run PID-SETUP.EXE to install the program. Run the program. Click on the File Menu, Open, and the Windows File Open menu appears. Select and open any JPG, GIF or BMP file. The image will appear on the screen. Then position the cursor anywhere in the image and click the left mouse button. A small cross will be placed on the cursor location and the coordinates in pixels will be recorded on the left of the screen. Move the cursor around and click on several different locations. Each
location you click is recorded. To remove the last point, click the Undo button, the Undo menu item, or the right mouse button. To save the recorded points in a file, click the save button or on the file menu click Save or Save As, and the Windows File Save menu appears. You can save two different files: first the list of coordinates and then the image on the screen showing the point locations. File save is only available in the purchased version.
Screen Display
There is an information line on the bottom of the screen. Button hints and program messages are shown on the far left. The X and Y coordinates of the current cursor position is shown on the far right. These coordinates change as you move the cursor. X and Y are zero at the lower left corner of the screen. "Distance:" is the distance between the last 2 selected points and it changes every time you click to record a new point. "Radius:" is the radius through the last 3 selected points and it also changes every time you click to record a new point. In planar geometry there is only one radius through any 3 points on a plane. If the 3 points are all on the same line, the radius is infinite and nothing will be displayed.
Install
Run PID-SETUP.EXE to install the program. This will create a folder, copy all the files to the folder, and create shortcuts on the desktop and the start menu. An alternate install method is to download the executable file PID.EXE. Then just run the program. If you use this method, then to uninstall simply delete the files.
UnInstall
Open Windows Control Panel, select Add Remove Programs, select Precision Image Digitizer in the list of programs, and click OK. The uninstall program will then run and remove the program. If you installed the program manually then delete the files to uninstall the program.
Buttons, Menu Items, Flyover Hints
All of the program functions can be used by either pressing a button on the top of the screen or in the pull down menus on the top of the screen. If you place the mouse cursor over a button a small hint appears describing the button function. At the same time a description also appears on the bottom left of the screen.
File New
This clears the coordinate list and the image screen becomes all white with no points. All previously recorded points and screen images are erased from memory. The size of the new file is the entire available screen area. Even though an image is not displayed on the screen, you can still click, record, and then save the point files.
File Open
This opens a new image file. The Windows File Open menu appears which will allow you to select any image file that ends in the file extension JPG, GIF, or BMP. If you click on one of these files a small preview image appears.
File Save and File Save As
This saves a file of the coordinates and/or the screen image. First the Windows File Save menu appears and allows you to save a list of the coordinates. The Windows File Save menu then appears a second time to allow you to save the image on the screen. You can save either file or both files. The coordinate list can be saved in several different formats:
Text File (space delimited) (*.txt)
Text File (comma delimited) (*.txt)
Text File (tab delimited) (*.txt)
AutoCad DXF File (*.dxf)
Each of these is a plain ASCII text file of the selected coordinates measured in pixels. The first 3 file formats are similar. The difference is in the characters used as spaces between the coordinates. The coordinates are saved as X, Y, Z, but the Z value is always zero because all the points lie in the same plane. The coordinates are measured in pixels from the zero location (0, 0) at the lower left of the image. The horizontal axis is X, the vertical axis is y. All coordinates are positive numbers. The screen image can be saved in several different formats:
Any one of these formats may be selected even if the original opened file was in a different format. For example, if a JPG file was opened, a GIF file can then be saved. The saved image will include the original image and also the image of the points on the screen.
File Print
This prints the coordinates and/or the screen image. First the Windows Print menu appears and allows you to print a list of the coordinates. The Windows Print menu then appears a second time to allow you to print the image on the screen. You can print both files or either file.
Edit Undo
This removes the last selected point from the list and the screen. You can click undo repetitively to undo as many points as you like. Undo is available for every point selected so you can even undo all of the points until there are no points left. Undo can also be performed by clicking the right mouse button.
Edit Cut
This copies the screen into the Windows Clipboard so you can then paste the image into another Windows program. Cut does not remove the image from the screen so it is really the same as Edit Copy.
Edit Copy
This copies the screen into the Windows Clipboard so you can then paste the image into another Windows program.
Edit Paste
This pastes the image in the Windows Clipboard onto the screen. This is another method for loading an image into the program. You can copy an image from any other Windows program. When you paste an image onto the screen, the image that was on the screen is erased, and all previously recorded points are also erased. Before this happens you will be asked if you would like to save them as files.
View Zoom In
This zooms in on the screen image. Only the image on the screen is magnified. The actual scale of the image file and the screen coordinates is fixed and does not change. The image can be magnified up to 400% or as limited by available memory. Images initially load at 100% size. On the button row at the top of the screen you can see the number 100% displayed. Click this button and you can select a different scale from the drop-down list.
View Zoom Out
This zooms out on the screen image. Only the image on the screen is reduced. The actual scale of the image file and the screen coordinates is fixed and does not change. The image can be reduced down to 25% size. Images initially load at 100% size. On the button row at the top of the screen you can see the number 100% displayed. Click this button and you can select a different scale from the drop-down list.
Options Cursor Style
This changes the mouse screen cursor to one of many options.
Options Point Style
This changes the type of the point drawn on the screen each time you click the left mouse button to record a point. Every point selected after the change will be displayed in the new form, but the points already on the screen will not change.
Options Point Color
This changes the color of the point drawn on the screen each time you click the left mouse button to record a point. Every point selected after the change will be displayed in the new color, but the points already on the screen will not change.
Options Sound
Every time you click the left mouse button the program makes a click sound. This option allows you to turn the click sound on or off.
Options Startup Tips
This allows you to turn on and off the program help tips window that pops up when you start the program. You can also turn these tips off by clicking in the check box in the pop-up window labeled "Don't show this startup tips window." In the pop-up window you can view the next tip by clicking the next button. The program will show a different tip each time it starts.
Options Scale Units
This changes the scale factor to the coordinates so the numbers on the bottom of the screen are displayed in real units such as inches. Only the numbers on the bottom of the screen in the "Distance" and "Radius" boxes change units. The units of the selected coordinates on the left of the screen, the coordinates saved in the files, and the printed coordinates are always in pixels. Setting the scale factor is very easy. Just click on two points on the image where you know the distance between the points. Then click on the Options menu item Scale Units (or the button with a graph) and the set scale form appears. Type in the true distance between the points and click on the Calculate Scale button. Then click the OK button. The measurements on the bottom of the screen will now be in the selected units and scale.
To reset the units to pixels, open the Scale Units form and click Reset Scale and then click OK. You can also directly type in the Distance in Pixels and the True Distance and then click Calculate Scale. The Reset Scale button returns all displays to pixels.
Saved Settings
When PID closes it remembers all of it's settings by saving them in a text file PID.INI which it creates and maintains in the same folder where PID.EXE is located. This is fully automatic, but you can also edit this file with a text editor. Here is a sample PID.INI file:
[SETTINGS]
MAXIMIZED=1
WINDOW TOP=-4
WINDOW LEFT=-4
WINDOW WIDTH=1032
WINDOW HEIGHT=745
DIRECTORY=C:\My Documents
CURSOR=8
POINT STYLE=1
POINT COLOR=255
SOUND=1
STARTUP TIPS=1
TIP NUMBER=3
PID copies this file to the PID folder during installation, or if the file does not exist, PID will create it the first time the program closes. PID does not save these settings in the Windows Registry or any other Windows file.
MAXIMIZED is either 0 or 1, where 1 means the program starts maximized.
WINDOW TOP, WINDOW LEFT, WINDOW WIDTH, and WINDOW HEIGHT, are the location and size of the program window in pixels as measured from the upper left corner of the screen.
DIRECTORY is the folder location of the last file opened. This will be the folder that appears the next time the Windows File Open menu is displayed. The default DIRECTORY (folder) is My Documents.
CURSOR is a number from 0 to 13 representing the cursor style.
POINT STYLE is a number from 0 to 7.
POINT COLOR is a number from -2,147,483,648 to 2,147,483,647.
SOUND is either 0 or 1, where 1 means the program makes a click sound each time you click the mouse button to record a point. 0 means no sound.
STARTUP TIPS is either 0 or 1, where 1 means the help tips tip pop-up window appears each time the program is started. 0 means the window does not appear.
TIP NUMBER is a number from 0 to 20 representing the number of the last startup help tip displayed.
File Save and File Print only available in the PURCHASED version.
The program works fine even if you do not pay for it. There is no time limit. It will run forever. It contains no spyware, no advertising.
The purchase price is
$20.00
(Twenty US Dollars). I accept major credit cards,
PayPal
, or personal checks. Pay once and all future upgrades are free. If you do not have a PayPal account, you can still use PayPal to make a payment using your credit card or a direct withdrawal from a bank account.
Or send personal check or money order payable to Michael Robinson
Michael Robinson
PO Box 95
Shelton, CT 06484
Fully enabled purchased version (with file save and print) will be sent within 24 hours by email attachment.
Please add $10.00 if you would like a CD sent by US Mail to an address in the USA.
Please add $20.00 if you would like a CD sent by US Mail to an address outside the USA.
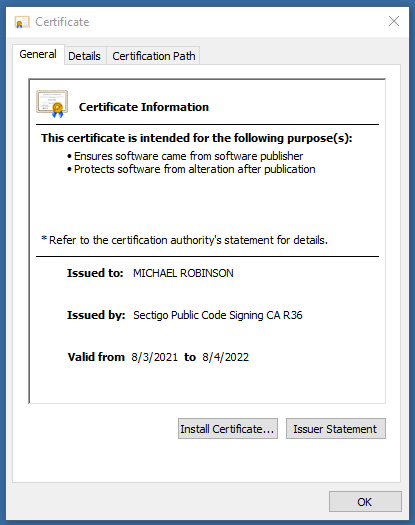
I am PayPal Verified. My Account Creation Date is May 30, 2000.
The Official PayPal Verified Seal above means that I have provided PayPal with proof that I have a bank account and that my address is valid. Banks are required by law to screen account holders so PayPal's verification process increases security when you pay parties you do not know. My bank has my address and Social Security number on file. You can check that I am verified by clicking the PayPal Verified Seal above or by clicking on this link:
I use PayPal because the fees are low. If you send me $20.00 PayPal only takes about $1.00 so I net $19.00. All other payment services take several dollars so I would have to charge around $25 for my program to gain the same net. This lowers the cost to you. PayPal is usually free for most transactions, such as Ebay auction payments, but as a business I am required to have a Premier Account with fees. If you do not have a PayPal account, you can still use PayPal to make a payment using your credit card or a direct withdrawal from a bank account. PayPal is a very secure and reliable payment system used by millions of people around the world. All of your personal information is encrypted.